The Starch, the Heat, and the Harmony: Unveiling the Science of Potato Pancakes
 At the heart of a great potato pancake lies a delicate interplay of starch gelatinization, protein coagulation, and the Maillard reaction. Let’s break it down. First, the starch within the potatoes needs to gelatinize. This happens when the potato is heated in the presence of water (naturally occurring within the potato itself). As the starch granules absorb water, they swell and soften, contributing to the pancake’s tender interior. However, too much moisture and insufficient heat will lead to a gummy texture. Next, the heat denatures and coagulates the proteins present in the potato and the egg (if using). This process provides structure and helps bind the pancake together. Finally, the Maillard reaction, that magical browning process, occurs when reducing sugars and amino acids are heated to high temperatures. This is what gives the potato pancake its desirable golden-brown color and complex, nutty flavor. The addition of onion and cheese introduces further nuances. Onions contribute sweetness and savory depth, while cheese adds richness, moisture, and further browning potential. The key is to manage moisture content, temperature, and cooking time to optimize all these processes simultaneously.
The Ultimate Potato Onion Cheese Pancake Recipe
This recipe, honed through rigorous experimentation, consistently delivers perfectly crisp-edged, tender-centered potato onion cheese pancakes.Ingredients:
- 2 lbs Russet potatoes, peeled
- 1 large yellow onion, finely grated
- 2 large eggs, lightly beaten
- 1 cup all-purpose flour, plus more if needed
- 1 cup shredded cheddar cheese
- 1/4 cup chopped fresh chives (optional)
- Salt and freshly ground black pepper to taste
- Vegetable oil, for frying
Instructions:
1. Prepare the Potatoes: Using a box grater or food processor with a grating attachment, grate the peeled potatoes. 2. Remove Excess Moisture: This is crucial! Place the grated potatoes in a clean kitchen towel or cheesecloth. Squeeze out as much liquid as possible. The drier the potatoes, the crispier the pancakes. 3. Combine Ingredients: In a large bowl, combine the squeezed-out potatoes, grated onion, beaten eggs, flour, cheddar cheese, and chives (if using). Season generously with salt and pepper. 4. Adjust Consistency: The mixture should be thick enough to hold its shape but not too dry. If the mixture seems too wet, add a tablespoon or two more flour until it reaches the desired consistency. 5. Heat the Oil: Heat about 1/4 inch of vegetable oil in a large skillet over medium-high heat. The oil should be hot but not smoking. Test the oil by dropping a small amount of the potato mixture into the pan. If it sizzles and browns quickly, the oil is ready. 6. Form the Pancakes: Drop spoonfuls of the potato mixture into the hot oil, flattening them slightly with the back of a spoon. 7. Fry the Pancakes: Fry for 3-4 minutes per side, or until golden brown and crispy. Be careful not to overcrowd the pan; work in batches. 8. Drain and Serve: Remove the cooked pancakes from the skillet and place them on a paper towel-lined plate to drain excess oil. Serve immediately while hot and crispy. These are delicious on their own, or with a dollop of sour cream or applesauce.The Culinary Chronicle: My Quest for Pancake Perfection
My first few attempts were a disaster. I envisioned perfectly golden, crispy potato pancakes, but what I got was a greasy, mushy mess that tasted overwhelmingly of raw potato. Then, I had an “Aha!” moment: moisture was the enemy. Like many of you, I initially thought that more moisture meant a more tender interior. I was wrong!The Great Squeeze-Out: Moisture Control is Key
Initially, I underestimated the importance of removing excess moisture from the grated potatoes. My first batch was swimming in liquid even before it hit the hot oil. The pancakes absorbed the oil like sponges, resulting in a greasy, soggy texture. The solution? A relentless squeeze-out! I experimented with different methods – paper towels, cheesecloth, even a potato ricer. Cheesecloth, I found, provided the best combination of absorbency and durability. Squeezing out every last drop made a monumental difference.The Onion Conundrum: Grate vs. Chop
The onion presented another challenge. Chopped onions, while adding texture, often burned before the potatoes were fully cooked. Grated onions, on the other hand, distributed their flavor more evenly and cooked more uniformly. However, grated onions also release a significant amount of moisture. To combat this, I started grating the onions directly into the cheesecloth with the potatoes, allowing me to squeeze out both simultaneously. Problem solved!The Flour Fiasco: Too Much, Too Little, Just Right
Finding the right amount of flour was a delicate balancing act. Too much flour resulted in a dense, starchy pancake that lacked the delicate potato flavor. Too little flour, and the pancakes fell apart in the pan. I experimented with different types of flour – all-purpose, potato starch, even rice flour. In the end, I settled on all-purpose flour, but the key was to add it gradually, adjusting the amount based on the moisture content of the potatoes.The Cheese Choice: Experimentation and Discovery
The cheese added a wonderful richness and flavor, but it also presented a potential for disaster. Too much cheese, and the pancakes became overly greasy and difficult to handle. Too little cheese, and the flavor was barely noticeable. I experimented with different types of cheese – cheddar, Monterey Jack, even a bit of Gruyere. Ultimately, I found that a sharp cheddar provided the best balance of flavor and texture. I also discovered that adding the cheese after squeezing the potatoes helped to prevent it from absorbing too much moisture.The Heat is On: Mastering the Frying Process
Achieving that perfect golden-brown crust without burning the interior was a constant struggle. I experimented with different oil temperatures, cooking times, and pan sizes. I found that medium-high heat was the sweet spot. It allowed the pancakes to brown quickly without burning, while also ensuring that the interior was cooked through. It’s also important to not overcrowd the pan. While I was at it, I even experimented with different variations, like adding bacon bits. This reminded me of a breakfast casserole dish, like Chili Cheese Tater Tot Casserole, but in pancake form! I also tried making a sweeter version, which reminded me of Mashed Sweet Potatoes Recipe, but it wasn’t nearly as good. I also tried making a sort of “pizza” pancake, similar to Pizza Tot Casserole, but it didn’t turn out well either.The Foolproof Formula: Your Guide to Perfect Potato Onion Cheese Pancakes
After countless iterations and a few near-disasters, I’ve distilled the process down to a simple, foolproof method:- Grate the Potatoes and Onions: Use a box grater or food processor to grate the potatoes and onions finely.
- Squeeze Out the Moisture: This is non-negotiable! Use cheesecloth to squeeze out as much liquid as possible.
- Combine Ingredients: In a bowl, combine the squeezed potatoes and onions, eggs, flour, cheese, and seasonings. Adjust flour as needed.
- Heat the Oil Properly: Heat about 1/4 inch of vegetable oil in a large skillet over medium-high heat.
- Fry in Batches: Drop spoonfuls of the mixture into the hot oil, flattening them slightly. Fry for 3-4 minutes per side, or until golden brown and crispy.
- Drain and Serve Immediately: Place the cooked pancakes on a paper towel-lined plate to drain excess oil. Serve hot and crispy!
Why is it important to remove excess moisture from the grated potatoes?
Removing excess moisture is crucial for achieving crispy potato pancakes. Excess moisture leads to greasy, soggy pancakes that absorb too much oil during frying.
What is the best way to remove excess moisture from the potatoes?
The article recommends using cheesecloth to squeeze out as much liquid as possible from the grated potatoes and onions. This method provides the best combination of absorbency and durability.
What is the ideal oil temperature for frying potato onion cheese pancakes?
The article suggests using medium-high heat to fry the pancakes. This allows them to brown quickly without burning, while also ensuring that the interior is cooked through.
What type of cheese is recommended for the potato onion cheese pancakes and why?
The article recommends using a sharp cheddar cheese because it provides the best balance of flavor and texture for the pancakes.
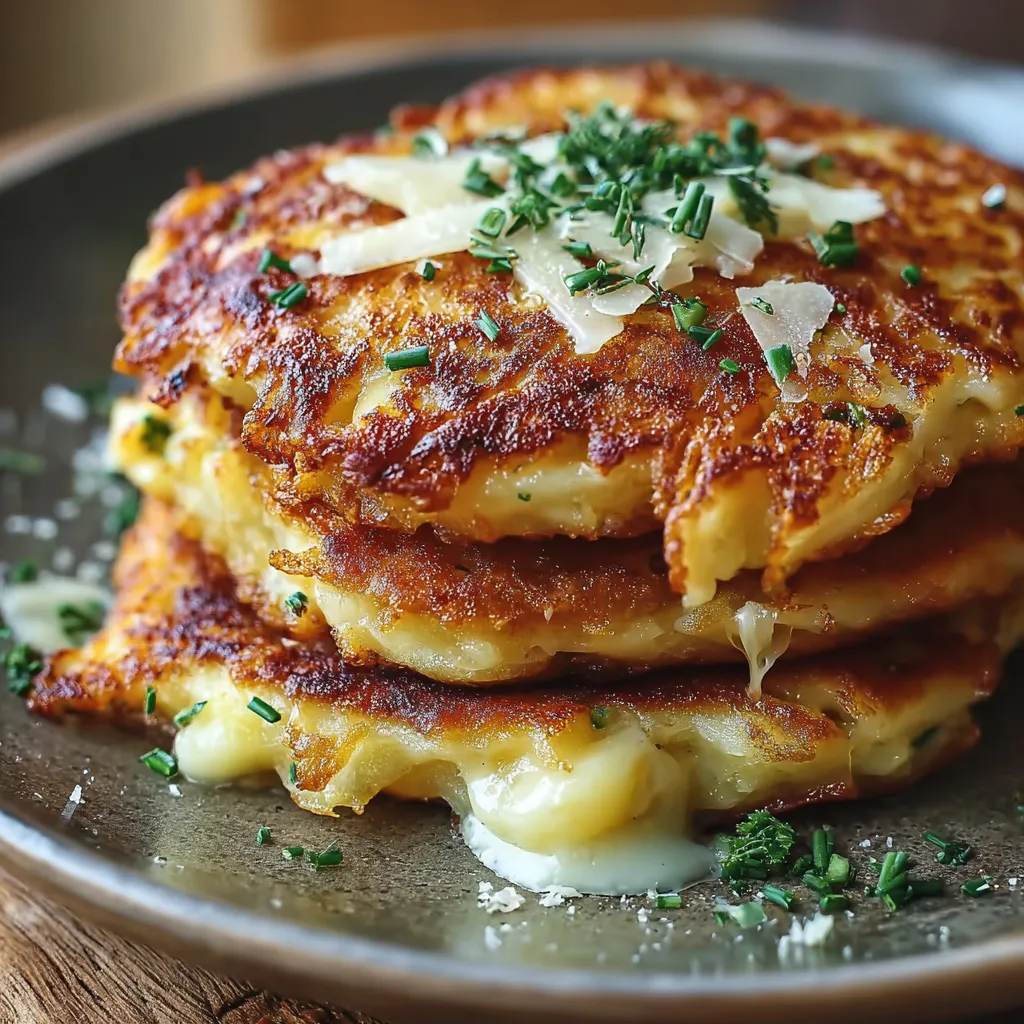
Irresistible Potato Onion Cheese Pancakes
These potato onion cheese pancakes are crispy on the outside and tender on the inside, offering a savory and satisfying dish. Excess moisture is removed from the potatoes for optimal crispiness, resulting in perfectly golden-brown pancakes.
Ingredients
Equipment
Method
- Using a box grater or food processor with a grating attachment, grate the peeled potatoes.
- Place the grated potatoes in a clean kitchen towel or cheesecloth. Squeeze out as much liquid as possible.
- In a large bowl, combine the squeezed-out potatoes, grated onion, beaten eggs, flour, cheddar cheese, and chives (if using). Season generously with salt and pepper.
- The mixture should be thick enough to hold its shape but not too dry. If the mixture seems too wet, add a tablespoon or two more flour until it reaches the desired consistency.
- Heat about 1/4 inch of vegetable oil in a large skillet over medium-high heat. The oil should be hot but not smoking. Test the oil by dropping a small amount of the potato mixture into the pan. If it sizzles and browns quickly, the oil is ready.
- Drop spoonfuls of the potato mixture into the hot oil, flattening them slightly with the back of a spoon.
- Fry for 3-4 minutes per side, or until golden brown and crispy. Be careful not to overcrowd the pan; work in batches.
- Remove the cooked pancakes from the skillet and place them on a paper towel-lined plate to drain excess oil.
- Serve immediately while hot and crispy. These are delicious on their own, or with a dollop of sour cream or applesauce.
Notes
For extra crispy pancakes, ensure the potatoes are as dry as possible. Experiment with different cheeses for varied flavors. These pancakes can be stored in the refrigerator for up to 3 days, but they are best served fresh. Reheat in a skillet to maintain crispness.