The Doughy Dilemma: A Scientific Breakdown
 The secret to a truly great pizza pocket hinges on understanding the science of dough and cheese. We’re essentially aiming for a miniature, hand-held calzone, but one that avoids the pitfalls of a soggy bottom, uneven cooking, and a filling that oozes out faster than you can say “marinara.” The dough needs to be sturdy enough to hold its cargo, yet pliable enough to create a proper seal. This means gluten development is key. Gluten, formed from the proteins glutenin and gliadin in wheat flour when mixed with water, provides the elasticity and strength. Overworking the dough results in a tough, chewy pocket, while underworking it yields a fragile one prone to bursting.
Then there’s the cheese. Mozzarella, with its excellent melting properties and mild flavor, is the classic choice, but the moisture content is crucial. Too much moisture and you’ll end up with a watery, separated mess inside your pocket. Lower-moisture mozzarella is ideal, or you can even shred your own and let it drain on paper towels for a bit. Other cheeses, like provolone or a sharp cheddar, can add depth of flavor, but they also contribute to the overall moisture level and melting behavior.
Finally, the cooking process. High heat is essential for achieving a golden-brown crust and ensuring the filling is heated through. However, too high a temperature can lead to burning before the inside is cooked, while too low a temperature results in a pale, doughy pocket. Convection ovens, with their circulating air, are particularly effective at even cooking, but a standard oven works just fine with a few adjustments.
The secret to a truly great pizza pocket hinges on understanding the science of dough and cheese. We’re essentially aiming for a miniature, hand-held calzone, but one that avoids the pitfalls of a soggy bottom, uneven cooking, and a filling that oozes out faster than you can say “marinara.” The dough needs to be sturdy enough to hold its cargo, yet pliable enough to create a proper seal. This means gluten development is key. Gluten, formed from the proteins glutenin and gliadin in wheat flour when mixed with water, provides the elasticity and strength. Overworking the dough results in a tough, chewy pocket, while underworking it yields a fragile one prone to bursting.
Then there’s the cheese. Mozzarella, with its excellent melting properties and mild flavor, is the classic choice, but the moisture content is crucial. Too much moisture and you’ll end up with a watery, separated mess inside your pocket. Lower-moisture mozzarella is ideal, or you can even shred your own and let it drain on paper towels for a bit. Other cheeses, like provolone or a sharp cheddar, can add depth of flavor, but they also contribute to the overall moisture level and melting behavior.
Finally, the cooking process. High heat is essential for achieving a golden-brown crust and ensuring the filling is heated through. However, too high a temperature can lead to burning before the inside is cooked, while too low a temperature results in a pale, doughy pocket. Convection ovens, with their circulating air, are particularly effective at even cooking, but a standard oven works just fine with a few adjustments.
The Ultimate Cheesy Pizza Pocket Recipe
Here’s the recipe I’ve honed after countless iterations, incorporating all the scientific principles discussed:Ingredients:
- 1 package (13.8 oz) refrigerated pizza dough
- 1 cup marinara sauce, divided
- 2 cups shredded low-moisture mozzarella cheese
- ½ cup pepperoni, sliced (or other pizza toppings of your choice)
- 1 tablespoon olive oil
- 1 teaspoon garlic powder
- ½ teaspoon Italian seasoning
- Optional: Grated Parmesan cheese for topping
Instructions:
- Preheat oven to 400°F (200°C). Line a baking sheet with parchment paper.
- On a lightly floured surface, roll out the pizza dough into a large rectangle, about 12×16 inches.
- Cut the dough into 8 equal squares.
- In a small bowl, combine olive oil, garlic powder, and Italian seasoning. Brush this mixture evenly over the dough squares.
- Spoon about 2 tablespoons of marinara sauce onto one half of each dough square, leaving a ½-inch border.
- Top the sauce with mozzarella cheese and pepperoni (or your chosen toppings).
- Fold the other half of the dough over the filling to form a triangle or rectangle.
- Press the edges firmly to seal, using a fork to crimp the edges for extra security. This is CRUCIAL to avoid leaks!
- Place the pizza pockets on the prepared baking sheet.
- Optional: Brush the tops of the pizza pockets with a little more olive oil and sprinkle with grated Parmesan cheese.
- Bake for 15-20 minutes, or until golden brown and the cheese is melted and bubbly.
- Let cool slightly before serving. Be careful, the filling will be hot!
The Investigation: My Quest for the Perfect Pocket
My journey to crafting the ultimate cheesy pizza pocket was far from smooth. My first few attempts were a disaster. I envisioned perfectly golden, cheese-filled triangles of joy, but I ended up with a soggy, leaky mess that resembled something closer to a culinary crime scene.Act I: The Soggy Saga
Like many of you, I initially thought, “Just throw some sauce, cheese, and pepperoni in pizza dough and bake!” Oh, how wrong I was. The first batch emerged from the oven with a pale, doughy crust and a filling that had exploded out the sides, creating a molten cheese lava flow. The culprit? Too much sauce! The moisture seeped into the dough, preventing it from crisping up. It was a soggy, sad affair.Act II: The Doughy Debacle
Next, I focused on the dough. I figured pre-made pizza dough was the way to go for convenience, but I soon realized not all pre-made doughs are created equal. Some were too thin and fragile, tearing easily and unable to hold the filling. Others were too thick and dense, resulting in a heavy, bread-like pocket that lacked the desired lightness. I experimented with different brands and even tried making my own dough from scratch (a whole other adventure!), but finding the right balance was a challenge. This reminded me of another dough-centric dish, the Philly Cheesesteak Roll Ups, where the dough’s texture plays a vital role.Act III: The Cheese Conundrum
Then, I had an “Aha!” moment regarding the cheese. I realized that the type of mozzarella I was using was the problem. The high-moisture mozzarella, while delicious on a regular pizza, was releasing too much water during baking, contributing to the sogginess. Switching to low-moisture mozzarella, and even patting it dry with paper towels before using, made a HUGE difference. It melted beautifully without turning the pocket into a swimming pool of cheese and grease. I considered adding other cheeses for flavor, like in Cheesy Chicken Crescent Bake.Act IV: The Sealing Solution
Finally, I tackled the sealing issue. Simply folding the dough over and pressing the edges together wasn’t enough. The filling would inevitably find its way out, creating a sticky mess on the baking sheet. I tried various techniques – egg washes, water seals – but the most effective method proved to be crimping the edges with a fork. This created a tight, secure seal that could withstand the pressure of the expanding filling. Plus, it added a nice decorative touch! These pizza pockets have been a big hit, my family loves them way more than when I make Pizza Tot Casserole.The Foolproof Formula: Mastering the Pizza Pocket Technique
After all my experimentation, here’s the definitive, foolproof technique for creating perfect cheesy pizza pockets every time:- Choose the Right Dough: Opt for a refrigerated pizza dough that’s neither too thin nor too thick. Experiment with different brands to find one you like.
- Control the Moisture: Use low-moisture mozzarella cheese. Pat it dry with paper towels if necessary. Go easy on the sauce!
- Seal the Deal: Crimp the edges of the dough with a fork to create a tight, secure seal.
- Bake at the Right Temperature: 400°F (200°C) is the sweet spot for a golden-brown crust and a melted, bubbly filling.
- Don’t Overfill: Resist the urge to cram too much filling into the pockets. Overfilling leads to leaks and uneven cooking.
What is the key to preventing soggy pizza pockets?
Controlling moisture is crucial. Use low-moisture mozzarella cheese, pat it dry if necessary, and don’t use too much sauce.
Why is sealing the pizza pockets properly so important?
A tight seal prevents the filling from leaking out during baking, which creates a sticky mess and affects the overall texture of the pizza pocket.
What temperature should I bake the pizza pockets at for the best results?
Bake the pizza pockets at 400°F (200°C) to achieve a golden-brown crust and a melted, bubbly filling.
What type of dough is recommended for making pizza pockets?
Refrigerated pizza dough that’s neither too thin nor too thick is recommended. Experiment with different brands to find one you like.
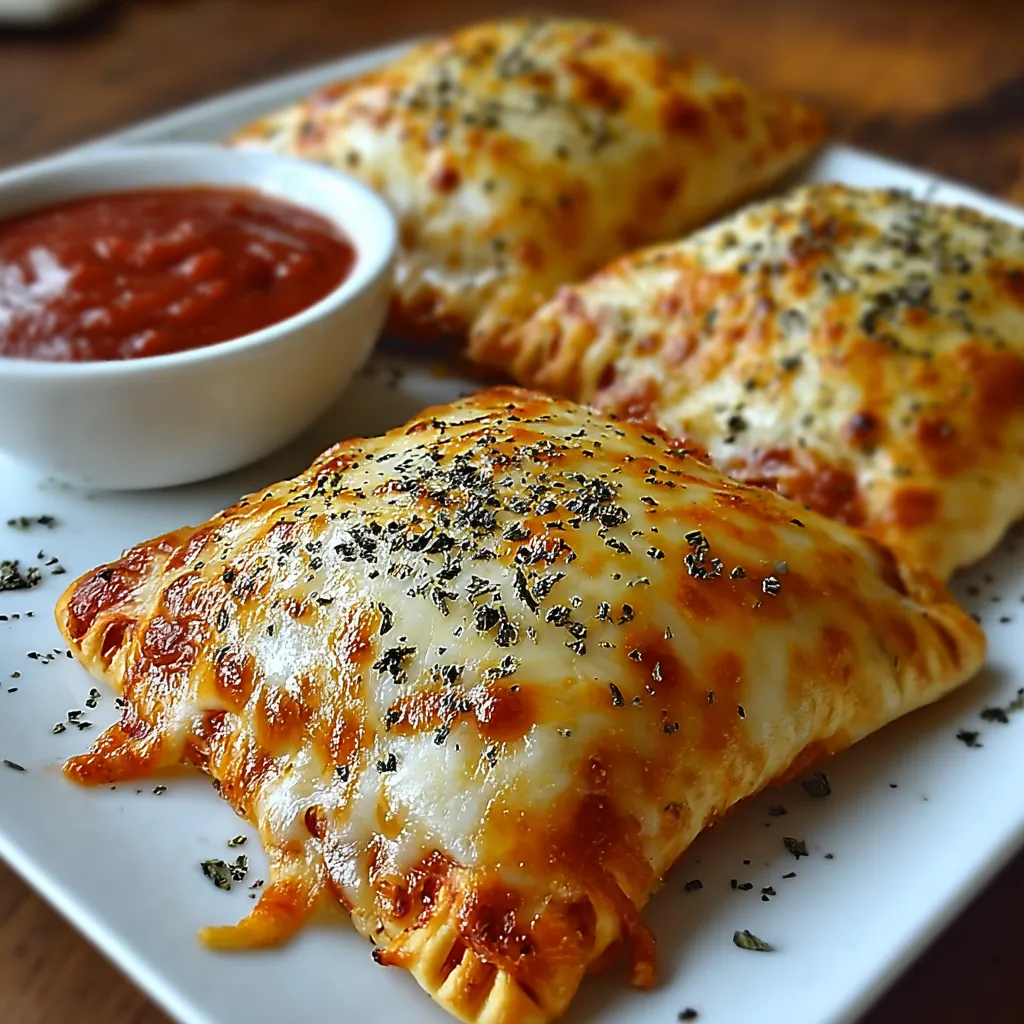
Easy Cheesy Pizza Pockets
These easy cheesy pizza pockets are a simple and delicious way to enjoy a handheld version of pizza. They’re perfect for a quick lunch, snack, or even a fun dinner, and can be customized with your favorite pizza toppings.
Ingredients
Equipment
Method
- Preheat oven to 400°F (200°C). Line a baking sheet with parchment paper.
- On a lightly floured surface, roll out the pizza dough into a large rectangle, about 12×16 inches.
- Cut the dough into 8 equal squares.
- In a small bowl, combine olive oil, garlic powder, and Italian seasoning. Brush this mixture evenly over the dough squares.
- Spoon about 2 tablespoons of marinara sauce onto one half of each dough square, leaving a ½-inch border.
- Top the sauce with mozzarella cheese and pepperoni.
- Fold the other half of the dough over the filling to form a triangle or rectangle.
- Press the edges firmly to seal, using a fork to crimp the edges for extra security.
- Place the pizza pockets on the prepared baking sheet.
- Optional: Brush the tops of the pizza pockets with a little more olive oil and sprinkle with grated Parmesan cheese.
- Bake for 15-20 minutes, or until golden brown and the cheese is melted and bubbly.
- Let cool slightly before serving. Be careful, the filling will be hot!
Notes
Use low-moisture mozzarella to avoid soggy pockets. Pat the cheese dry with paper towels if needed. Crimp the edges well to prevent leaks. Customize the fillings with your favorite pizza toppings. Store leftovers in an airtight container in the refrigerator for up to 3 days. Reheat in the oven or microwave.